Sorry I've been so absent. Busy, as usual. Instead of a recipe today, here are the top five things I like about canning.
1: You have an abundance of something, and you can TOTALLY keep it. Bought a bunch of stonefruit at the farmer's market and then realized you can't eat it all? My nectarine-plum jam from last year was one of the best I've ever made, and it was completely that kind of situation. I saw blackberries for a ridiculously low price at Costco this weekend, and instead of thinking "Aw, I'll never be able to eat all those before they go bad," I thought "Jam!" And then there was jam, and it was good, and we'll be able to have in when no blackberries are in season.
2: You can make stuff the way you like it. I, for instance, really prefer my jams less sweet, more chunky and seedy, and a little rustic, I guess. I have no love at all for Smuckers. I want my fruit to taste like fruit. And when you can your own, you can make it exactly like you want it. If that is sweet and seedless and sticky, have fun!
3: You're free to experiment. Late summer/early fall this year, I bought 40 pounds of plums. I then proceeded to make black-pepper plum jam, thai chile plum jam, much hotter Thai chile plum jam, cinnamon plum jam, ginger plum jam, star anise plum jam, and plain old plum jam. Because why not? I have also tried strawberry vanilla, blackberry honey, and pear ginger. I've made pickles with far more chiles than the recipe called for, because that's how we like them. As long as you know the basics of how much acid you need, it's really no big deal to mess around a little. If you have a pectin that you can use with no-sugar recipes, experiment with Splenda, with Stevia, with honey, with less sugar. I'm going to make a special batch of something for my diabetic aunt this year. 'Cause I totally can.
4: It's cheaper (sometimes). I think I ended up making eight batches of plum jam. I spent $20 on the plums, and I probably spent $20 on the jars (because I am not very good at keeping track of jars, and I give them away and always need new ones). If you figure about five half-pints per batch, that's a dollar per jar. I also save megabucks on pickles. My husband loves pickles, and we had to buy at least a jar every three weeks, and our favorite ones were about $6 a jar. I bought 10 pounds of cucumbers for $5 and made pickles with them, some sugar, some salt, and some cider vinegar. It was easy and very cheap. I also had big jars already, so my only expense was a pack of lids, which runs a couple bucks. There are exceptions, of course. If you're buying blackberries at $3 a pint and you need six pints to make a small batch, you're not saving any money. On the other hand, if you think of the fancy jams from twee little gift shops, you may still be saving compared to those.
5: It's nostalgic for me. Maybe this isn't true for you, but my grandmother was a canner. I'd go over and there would be jars sitting upside down on towels on the counter and her little kitchen would be filled with steam. In the winter, I would crack open a jar of apricot halves, and their smell, their texture, and their sweet syrup would entice me. I sometimes ate a whole jar in a sitting. She also made jams and jellies, and I've rarely if ever had better. Today I posted on Facebook about making apple butter, and my cousin pleaded with me to tell her it wasn't like Grandma's, because her mouth was watering. But it is. It's deep brown and has more cinnamon that most people probably use, and I used a nice tart apple, and it's divine. And it's like childhood came back for a second.
Bonus: Pickled carrots. These combine numbers 2-5. I'm a recent convert to pickled carrots, and I am insane in the membrane for them. But the ones in the store cost a lot more than my homemade version. Plus, they are often softer than I like. Plus, they sometimes come with other stuff I don't want, like onions or cauliflower. Plus, I like them nice and spicy, with lots of jalapenos! Plus, I'm going to try them with garlic next time. I'm not one to say that you can make absolutely anything you've tried and liked, but frankly, if it's something in a jar, I'm willing to bet you can (ouch, pun attack!).
Tuesday 22 November 2011
Saturday 25 June 2011
Try making your own condiments: Sriracha aka Rooster Sauce aka Hot Cock
There's something pretty special about inviting people over and being like "would you like some homemade chipotle catsup for your burger?" Or giving a new neighbor a jar of strawberry marmalade. Or serving up your own relish on hot dog night.
My husband's favorite condiment of all time is Sriracha, which is a vinegary and VERY HOT asian chile sauce. And he's not alone; there are web comics devoted to the stuff, and I've even seen a sriracha tattoo. As last weekend was Fathers Day, I decided to make him some.
Unlike many recipes, which I make a lot of changes to, I followed this one to the letter.
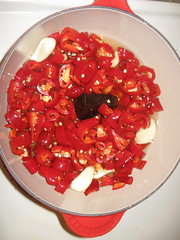
I soaked the vinegar, chiles, and garlic overnight in the fridge in a big jar. The vinegar didn't quite cover everything, so I shook it up once in a while.
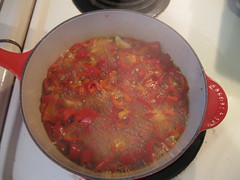
Then I threw them in a pot to cook.
I added palm sugar, which was hard to find, because at my Asian market, they apparently don't believe in having all the sugar together.
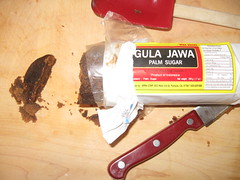
I cooked it according to the instructions, and the sugar added a dark molasses-y color. I'm not sure the flavor was that much different than brown sugar, but now that I have it, I'll use it next time I make sriracha. Might as well.
Then I pretty much blended it up.
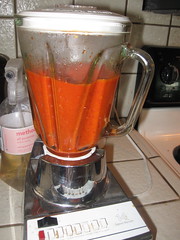
And threw it in a jar.
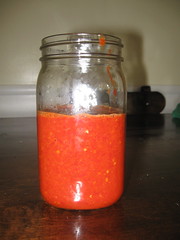
Sorry for such a super-fast post, but it was easy as pie!
Some notes would be that this is a touch sweeter and significantly less hot than the kind from the store. I personally can only use a few dots of that stuff, but I spread the homemade kind in a thin layer over a piece of toast with hummus. Your mileage may vary, though, as sometimes the peppers you buy are hotter than others.
Good luck and happy cooking!
My husband's favorite condiment of all time is Sriracha, which is a vinegary and VERY HOT asian chile sauce. And he's not alone; there are web comics devoted to the stuff, and I've even seen a sriracha tattoo. As last weekend was Fathers Day, I decided to make him some.
Unlike many recipes, which I make a lot of changes to, I followed this one to the letter.
I soaked the vinegar, chiles, and garlic overnight in the fridge in a big jar. The vinegar didn't quite cover everything, so I shook it up once in a while.
Then I threw them in a pot to cook.
I added palm sugar, which was hard to find, because at my Asian market, they apparently don't believe in having all the sugar together.
I cooked it according to the instructions, and the sugar added a dark molasses-y color. I'm not sure the flavor was that much different than brown sugar, but now that I have it, I'll use it next time I make sriracha. Might as well.
Then I pretty much blended it up.
And threw it in a jar.
Sorry for such a super-fast post, but it was easy as pie!
Some notes would be that this is a touch sweeter and significantly less hot than the kind from the store. I personally can only use a few dots of that stuff, but I spread the homemade kind in a thin layer over a piece of toast with hummus. Your mileage may vary, though, as sometimes the peppers you buy are hotter than others.
Good luck and happy cooking!
Tuesday 14 June 2011
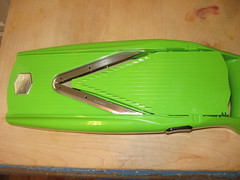
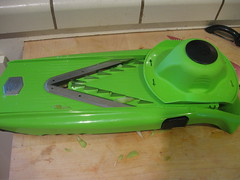
Get to know a tool: the mandoline. Also, summer squash "noodles."
A confession: most of these treats I make are just that -- treats. I try to be careful about my diet, and just as an example, the day that I knew I was going to eat some of that cake (along with other party nibbles), I ate almost nothing besides fruits, veggies, and scrambled egg whites all day. Today's post is far more fat-conscious than most. Just a heads-up.
I absolutely love eating out, and I have been hearing about a new sandwich place in town. I have shortened days this week, so today I picked up my daughter and we went to lunch. I had a beer-poached fig and goat cheese sandwich, followed by a Thai tea and sweet potato popsicle. So I knew I needed a light dinner.
Now, you can totally make "noodles"* with a vegetable peeler (just keep peeling down the length of the squash until there is no more to peel!), but I like the texture of these very thin, square strips I can make with my mandoline.
Technically, mine is called a "v-slicer," as most mandolines have just one straight blade. I had one of those for years, and it finally got really dull, so I asked my mom to pick this up at Sur la Table (woo-woo!). It has three plates you can slide in. One is just for slices, and it is adjustable from very thin to pretty thick. I used it on the thinnest setting to slice some jicama on Mothers' Day, and it was practically see-through and adhered to the bowl. It's great for things like cucumbers for sunomono or anything that says "shaved." Later this week, I'm thinking of pickling some carrots, so I'll probably use a thicker setting for those.
The other two plates have a bunch of vertical blades, so that you can either create long strips or a fine dice. I used the wider one to cut long strips of veggies for snacking.
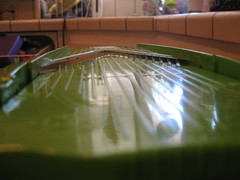
And today I used the thin blade attachment. I'll show you what I did!
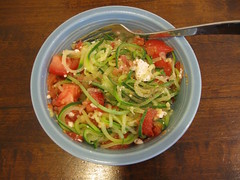
Zucchini "noodles" with feta and tomatoes
2 zucchini
2 cloves garlic
2 tomatoes
2 tsp capers
1/4 cup crumbled feta
fresh ground pepper, to taste
Get a large pot of well-salted water boiling. Cut the zucchini into super-thin slices, either with a vegetable peeler, a mandoline, or by hand if you're a badass.
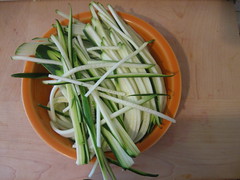
Drop the zucchini into the water and let cook for two minutes. Drain.
Chop garlic finely and put into a large serving bowl. Chop tomatoes into about a 1/2 inch dice and add them to the bowl. Add the capers and feta. Then put in the "noodles." Mix well and top with the pepper.
You can make lots of changes, of course. I actually really like olives in a dish like this, I just didn't have any. You could add a little olive oil, leave out the capers, or add something else you like. If you're really into salt, you could add some, but the feta is plenty salty for me. If this isn't filling, you could mix it half and half with real pasta, and it would cut down on the calories, too.
I recommend using a good feta, as I've gotten spoiled and inferior fetas make me sad now.
Not that it matters to me, but it's also gluten-free.
A couple notes on the mandoline/slicer: it's great for all kinds of things, like scalloped potatoes, crudite trays, chips, veggies for sushi... I use it almost as much as I use my food processor or Kitchen-Aid stand mixer, which are some serious staples in my house (I'll probably devote posts to them later). If you're a bit clumsy with a knife and end up with uneven slices, this thing is a lifesaver. But I do have a word of caution: it is SHARP. For serious. Like, I cut my hand on it and barely felt it, but it opened my hand right up. You should always use the guard thing that comes with it, and even then, be careful not to lean the heel of your hand too far back. Keep your hands FAR from the blades of this thing. The flat cutting panel has a safe setting for washing, but the others don't -- because they are not safe! Be careful out there. Oh, and for the record, my model is by Borner. It's made in Germany, so its warnings about using the guard start with ACHTUNG! Also, I just looked it up on Amazon (as always, I'm not getting paid or anything), and all the "related items" are cut-resistant gloves. So there.
*I have been careful to call these "noodles" rather than noodles, as the first time I made them, I called the dish "summer squash fettucini," which made my husband think there were actual pasta noodles involved. He was disappointed.
I absolutely love eating out, and I have been hearing about a new sandwich place in town. I have shortened days this week, so today I picked up my daughter and we went to lunch. I had a beer-poached fig and goat cheese sandwich, followed by a Thai tea and sweet potato popsicle. So I knew I needed a light dinner.
Now, you can totally make "noodles"* with a vegetable peeler (just keep peeling down the length of the squash until there is no more to peel!), but I like the texture of these very thin, square strips I can make with my mandoline.
Technically, mine is called a "v-slicer," as most mandolines have just one straight blade. I had one of those for years, and it finally got really dull, so I asked my mom to pick this up at Sur la Table (woo-woo!). It has three plates you can slide in. One is just for slices, and it is adjustable from very thin to pretty thick. I used it on the thinnest setting to slice some jicama on Mothers' Day, and it was practically see-through and adhered to the bowl. It's great for things like cucumbers for sunomono or anything that says "shaved." Later this week, I'm thinking of pickling some carrots, so I'll probably use a thicker setting for those.
The other two plates have a bunch of vertical blades, so that you can either create long strips or a fine dice. I used the wider one to cut long strips of veggies for snacking.
And today I used the thin blade attachment. I'll show you what I did!
Zucchini "noodles" with feta and tomatoes
2 zucchini
2 cloves garlic
2 tomatoes
2 tsp capers
1/4 cup crumbled feta
fresh ground pepper, to taste
Get a large pot of well-salted water boiling. Cut the zucchini into super-thin slices, either with a vegetable peeler, a mandoline, or by hand if you're a badass.
Drop the zucchini into the water and let cook for two minutes. Drain.
Chop garlic finely and put into a large serving bowl. Chop tomatoes into about a 1/2 inch dice and add them to the bowl. Add the capers and feta. Then put in the "noodles." Mix well and top with the pepper.
You can make lots of changes, of course. I actually really like olives in a dish like this, I just didn't have any. You could add a little olive oil, leave out the capers, or add something else you like. If you're really into salt, you could add some, but the feta is plenty salty for me. If this isn't filling, you could mix it half and half with real pasta, and it would cut down on the calories, too.
I recommend using a good feta, as I've gotten spoiled and inferior fetas make me sad now.
Not that it matters to me, but it's also gluten-free.
A couple notes on the mandoline/slicer: it's great for all kinds of things, like scalloped potatoes, crudite trays, chips, veggies for sushi... I use it almost as much as I use my food processor or Kitchen-Aid stand mixer, which are some serious staples in my house (I'll probably devote posts to them later). If you're a bit clumsy with a knife and end up with uneven slices, this thing is a lifesaver. But I do have a word of caution: it is SHARP. For serious. Like, I cut my hand on it and barely felt it, but it opened my hand right up. You should always use the guard thing that comes with it, and even then, be careful not to lean the heel of your hand too far back. Keep your hands FAR from the blades of this thing. The flat cutting panel has a safe setting for washing, but the others don't -- because they are not safe! Be careful out there. Oh, and for the record, my model is by Borner. It's made in Germany, so its warnings about using the guard start with ACHTUNG! Also, I just looked it up on Amazon (as always, I'm not getting paid or anything), and all the "related items" are cut-resistant gloves. So there.
*I have been careful to call these "noodles" rather than noodles, as the first time I made them, I called the dish "summer squash fettucini," which made my husband think there were actual pasta noodles involved. He was disappointed.
Monday 6 June 2011
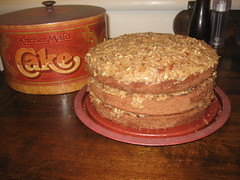
Perfect something: German's chocolate cake
First note: I realize it is pretty fussy to refer to it as "German's" rather than "German," and I swear I don't even do it when talking, but in print, it just looks wrong to me. It was developed by a dude named German, not a dude from Germany. So there you are.
In the Goodest Cooker's kitchen, I often try new recipes. I love, especially, to have some reason to look up a new recipe and try it out. I also love to improvise. But there is a special, gooey feeling I get inside when I know that I make something REALLY well, and that people look forward to seeing me with MY oatmeal chocolate chip cookies or some such. And the only way to do that is through practice.
So pick something, anything, and make it enough times to get really good at it.
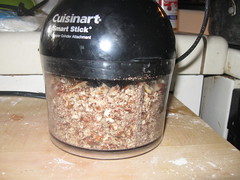
The thing about this cake is that it's a fairly simple recipe, and it even comes on the box of chocolate. But having made it so many times (I'm guessing about twenty, give or take a few), I have little tips and tricks, and I know what worked and didn't. For example, the flake coconut is way better than shredded coconut. And pecan halves are cheaper than chopped, but it's really important that the chunks aren't too big, so I use a chopper.
It's mainly about following the recipe, but I follow it really carefully.
And here it is:
German's chocolate cake
2 1/2 cups cake flour
1 teaspoon baking soda
1/2 teaspoon salt
1 bar Baker's German sweet chocolate
1/2 cup boiling water
1 cup butter or margarine
2 cups sugar
2 egg yolks, unbeaten
4 egg white, beaten stiff
1 teaspoon vanilla
1 cup buttermilk
Sift first three ingredients. Melt chocolate in water -- cool.
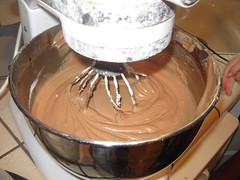
Cream butter and sugar until fluffy. Add egg yolks, one at a time, beating well after each. Mix in chocolate and vanilla. Add flour mixture alternately with buttermilk. Fold in beaten egg whites.
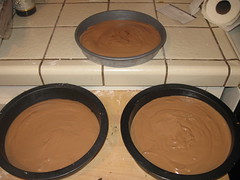
Pour into three 8 or 9 inch layer pans lined on the bottom with wax paper. Bake at 350 degrees for 30-40 minutes.
Coconut-pecan frosting
4 egg yolks
1 can evaporated milk
1 1/2 teaspoon vanilla
1 1/2 cups sugar
3/4 cup butter or margarine
1 package (7 oz) angel flake coconut
1 1/2 cups chopped pecans
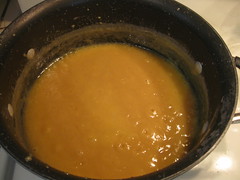
Beat egg yolks, milk and vanilla in a large saucepan with a whisk until well blended. Add butter and sugar and cook over medium heat 12 minutes or until thickened and golden brown, stirring constantly. Remove from heat. Add coconut and pecans. Mix well, then cool.
So here are my thoughts, tips, tricks, etc.
I am gadget-friendly. I make the batter in a Kitchen-Aid mixer, whip the eggs with an immersion blender, and chop the nuts using the same blender with a different attachment. Can you do it all with whisks and spoons? I supposed, but if you have some technology, it's going to make it a lot easier.
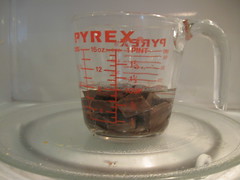
To melt the chocolate, I break it up into small chunks and drop it in a big Pyrex measuring cup with the water. Then I nuke it for 2 minutes. Stir it with a fork, and it's perfect.
I used parchment paper instead of wax paper. I recommend you use SOMETHING, though, as these cakes tend to stick, and when they stick too much, they can fall apart.
If you use Air-bake cake pans (or any other brand that has the double-layer walls), these will take the full 40 minutes. Test them to see if they're done by poking a knife into them.)
When it says to fold in the egg whites, that means don't mix it too much, just gently. Sort of stir up the batter from the bottom of the bowl, stir it a few more times until the white is mostly incorporated, and you're good. The egg whites are holding air bubbles, which helps make your cake super-fluffy. If you stir the heck out of it, you'll break all those bubbles.
I can be a little cheap and shortcutty, but not with this recipe. I use butter instead of margarine. I spring for Softasilk cake flour. I do all the steps, including adding the flour and buttermilk alternately. I don't even know what that bit is for, but I do it. I'm much more comfortable improvising when it comes to dinner. Baking is like science.
When the frosting is "thickened," you'll notice that it sticks to the back of the spoon. You could run your finger through the frosting there and it would leave a clear line.
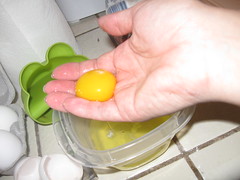
Although I mentioned I love gadgets, there are a lot of things I can do without, like egg separators. Step 1: crack egg. Step 2: pour it into your hand. Step 3: open your fingers a little. Egg separated.
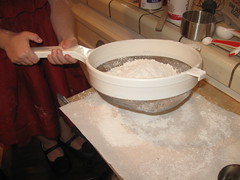
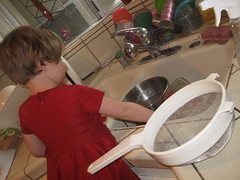
I don't sift, exactly. I use a big fine-mesh strainer thing. I used a sifter when I was a kid and all it ever did was give me hand cramps. This thing works as well and faster. Dump all your dry ingredients in, then give it a few shakes.
So easy a toddler could do it (with enormous amounts of supervision).
Get yourself a scullery maid to do the dishes.
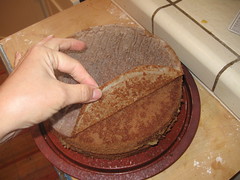
And a few more thoughts. My mom's frosting recipe was the same as the one on the box, but made about 25% less in volume. I like the larger quantity, because then you can really spread the frosting thickly between the layers. Sometimes I stretch it to cover the whole outside, but mostly I like it like this -- frosted between the layers and on top, but with bare sides. I have been to cafes where they have a chocolate ganache on the sides. This is heresy and it must be stopped.
Here is my cake. Now be careful, because it's really delicious. It's not pretty, though.
In the Goodest Cooker's kitchen, I often try new recipes. I love, especially, to have some reason to look up a new recipe and try it out. I also love to improvise. But there is a special, gooey feeling I get inside when I know that I make something REALLY well, and that people look forward to seeing me with MY oatmeal chocolate chip cookies or some such. And the only way to do that is through practice.
So pick something, anything, and make it enough times to get really good at it.
The thing about this cake is that it's a fairly simple recipe, and it even comes on the box of chocolate. But having made it so many times (I'm guessing about twenty, give or take a few), I have little tips and tricks, and I know what worked and didn't. For example, the flake coconut is way better than shredded coconut. And pecan halves are cheaper than chopped, but it's really important that the chunks aren't too big, so I use a chopper.
It's mainly about following the recipe, but I follow it really carefully.
And here it is:
German's chocolate cake
2 1/2 cups cake flour
1 teaspoon baking soda
1/2 teaspoon salt
1 bar Baker's German sweet chocolate
1/2 cup boiling water
1 cup butter or margarine
2 cups sugar
2 egg yolks, unbeaten
4 egg white, beaten stiff
1 teaspoon vanilla
1 cup buttermilk
Sift first three ingredients. Melt chocolate in water -- cool.
Cream butter and sugar until fluffy. Add egg yolks, one at a time, beating well after each. Mix in chocolate and vanilla. Add flour mixture alternately with buttermilk. Fold in beaten egg whites.
Pour into three 8 or 9 inch layer pans lined on the bottom with wax paper. Bake at 350 degrees for 30-40 minutes.
Coconut-pecan frosting
4 egg yolks
1 can evaporated milk
1 1/2 teaspoon vanilla
1 1/2 cups sugar
3/4 cup butter or margarine
1 package (7 oz) angel flake coconut
1 1/2 cups chopped pecans
Beat egg yolks, milk and vanilla in a large saucepan with a whisk until well blended. Add butter and sugar and cook over medium heat 12 minutes or until thickened and golden brown, stirring constantly. Remove from heat. Add coconut and pecans. Mix well, then cool.
So here are my thoughts, tips, tricks, etc.
I am gadget-friendly. I make the batter in a Kitchen-Aid mixer, whip the eggs with an immersion blender, and chop the nuts using the same blender with a different attachment. Can you do it all with whisks and spoons? I supposed, but if you have some technology, it's going to make it a lot easier.
To melt the chocolate, I break it up into small chunks and drop it in a big Pyrex measuring cup with the water. Then I nuke it for 2 minutes. Stir it with a fork, and it's perfect.
I used parchment paper instead of wax paper. I recommend you use SOMETHING, though, as these cakes tend to stick, and when they stick too much, they can fall apart.
If you use Air-bake cake pans (or any other brand that has the double-layer walls), these will take the full 40 minutes. Test them to see if they're done by poking a knife into them.)
When it says to fold in the egg whites, that means don't mix it too much, just gently. Sort of stir up the batter from the bottom of the bowl, stir it a few more times until the white is mostly incorporated, and you're good. The egg whites are holding air bubbles, which helps make your cake super-fluffy. If you stir the heck out of it, you'll break all those bubbles.
I can be a little cheap and shortcutty, but not with this recipe. I use butter instead of margarine. I spring for Softasilk cake flour. I do all the steps, including adding the flour and buttermilk alternately. I don't even know what that bit is for, but I do it. I'm much more comfortable improvising when it comes to dinner. Baking is like science.
When the frosting is "thickened," you'll notice that it sticks to the back of the spoon. You could run your finger through the frosting there and it would leave a clear line.
Although I mentioned I love gadgets, there are a lot of things I can do without, like egg separators. Step 1: crack egg. Step 2: pour it into your hand. Step 3: open your fingers a little. Egg separated.
I don't sift, exactly. I use a big fine-mesh strainer thing. I used a sifter when I was a kid and all it ever did was give me hand cramps. This thing works as well and faster. Dump all your dry ingredients in, then give it a few shakes.
So easy a toddler could do it (with enormous amounts of supervision).
Get yourself a scullery maid to do the dishes.
And a few more thoughts. My mom's frosting recipe was the same as the one on the box, but made about 25% less in volume. I like the larger quantity, because then you can really spread the frosting thickly between the layers. Sometimes I stretch it to cover the whole outside, but mostly I like it like this -- frosted between the layers and on top, but with bare sides. I have been to cafes where they have a chocolate ganache on the sides. This is heresy and it must be stopped.
Here is my cake. Now be careful, because it's really delicious. It's not pretty, though.
Monday 30 May 2011
Get to know an ethnic market (part 1): taco night!
I love ethnic markets. Not only can you sometimes get your normal groceries for much less money, you can find all kinds of stuff you don't generally see elsewhere. I'm willing to try darn near anything, so for me, ethnic markets are a bonanza of fun new stuff.
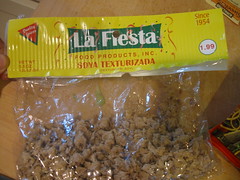
I went this week to La Superior Mercado, which, as you might have guessed, carries Hispanic foods. I love looking around, and I settled on a few items: a chayote squash, a bag of tomatillos, a small watermelon, some chili-spiced mango (just for a snack), a jicama, and a bag of nopalitos (cactus), pre-spined and diced. My total bill was just over $7. On another trip, I had seen a bag of "soya texturizada," and although I only speak enough Spanish to understand Speedy Gonzales, even I could figure that out -- TVP! It was a little less than at the hippie store, so I picked that up, too.
Just for fun, my family periodically studies another country or culture, so we've been eating Mexican food all week -- tamales (store-bought), refried beans (recipe below), a sort of Southwest-y salad -- but tonight I was going to do it up.
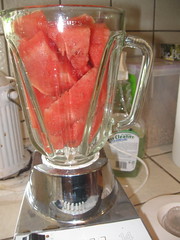
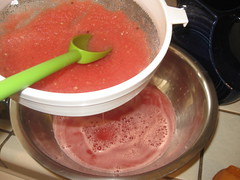
In the morning, I made watermelon liquados.
Watermelon liquados
1 personal-sized watermelon (preferably seedless)
1 Tbs crushed ginger
1/4 cup lime juice
water
I took all the watermelon out of the rind and threw it in the blender. Then I added about 2 cups of water, the ginger and lime juice. I blended it all to hell, then strained it into a bowl. I poured it into a pitcher and put it in the fridge until later. It was delicious and refreshing. I saw several similar recipes online, and all of them added sugar "to taste." I tasted it and felt it didn't need any sugar, but you do what you like.
I also started my refried beans, which I make in a slow cooker. These are such a hit in my house that we have them once a week.
Refried beans
2 cups dry pinto beans
1 onion
1 fresh jalapeno, diced OR 2 dried chipotle or de Arbol chiles, whole
1 Tbs cumin
2 Tbs salt
9 cups water
Peel the onion, cut the stem end off, and cut it in half. Add everything else to the slow cooker and turn it on "high." Leave it alone for about 9 hours (anywhere from 8-10 is fine). Drain most off the water off, remove the dried chiles if you used them, then mash with a potato masher. Done.
This recipe is pretty flexible -- you can put it in the slow cooker the night before to soak, then turn it on in the morning, or you can assemble it in the morning. You can use fresh or dried chiles, and any kind of onion. I was worried the first time I left it on High all day, because almost all the rest of my slow-cooker recipes call for the thing to be left on Low, but High is just perfect and won't burn your kitchen down, I swear.
Your bonus tip this week is "Get to know a measurement." I don't recommend this for baking, because baking is like science, but it works for most other cooking. Figure out how much a tablespoon is -- measure one out and dump it in the palm of your hand -- and then estimate it from now on. How much is 1/4 cup of water? What does it look like? If you can get to know some basic measurements, it'll cut down on the time it takes to cook as well as the dishes to clean up afterward.

One tablespoon of cumin.
After I turned the beans on, we spent the day at the fair. When we came home, I started cooking for real.
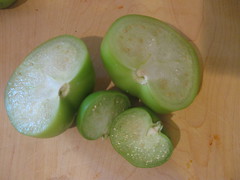
Tomatillo salsa
20 tomatillos, mixed sizes
1 red onion
2 serrano peppers
2 cloves garlic
1/2 cup loosely packed cilantro
lime juice
salt to taste
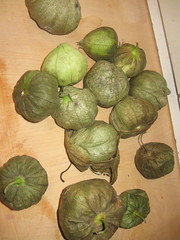
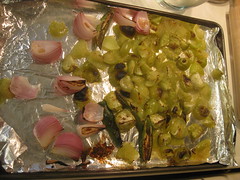
Remove the papery skins from the tomatillos, and cut into chunks (I cut the small ones into quarters and the big ones into eighths).
Put them on a cookie sheet, jelly roll pan, roasting pan, or whatever. I didn't want to clean it later, so I lined it with foil first.
Cut the onion into quarters and add to the pan. Then halve the peppers and remove the stems (I would leave the seeds in -- this was a fairly mild salsa) and add them as well.
I cooked it at a low broil. If you only have one option for broil, and that option is "nuclear," then roast at a high temperature, like 500, instead. I checked mine after 5 minutes and shook them around, then took them out after ten minutes when there were some nice dark brown bits.
Then I added the entire contents of the pan to my blender, threw in the garlic, added about 2 Tbs of lime juice, 1 Tbs salt, and the cilantro, then whirled it around until it was pretty.
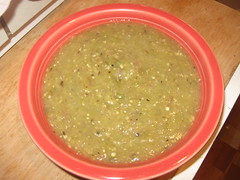
My daughter even liked it, and she really balks at spicy foods, so don't worry about the serranos.
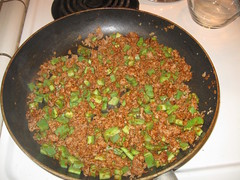
Veggie tacos
1 cup nopales, spines removed and diced
1 cup TVP
1 package taco seasoning (or feel free to use the spices -- I was being lazy)
hot water (about 2 cups)
In a bowl, soak the TVP in 1 cup of water. Put a little oil or cooking spray in a large pan over medium heat. Add the TVP and nopales, then the seasoning and additional water. It won't brown in the same way that meat will, but it will heat through, the nopales will get tender, and the seasoning will get mixed evenly.
Chayote squash
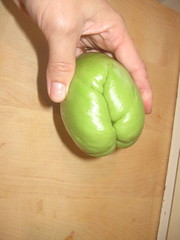
(I consulted this recipe)
1 Tbs olive oil
1 chayote
1/2 tsp salt
1 packet Splenda (or 1/2 tsp sugar)
1 Tbs lime juice
Peel and julienne the squash. Heat a small pan over medium-high heat and add the oil. Then add squash, salt, and sugar or sweetener. Saute, stirring frequently, for about 3 minutes, then add the lime juice and saute for about three more minutes. Serve.

Like my knife skills?
Just kidding -- I have one of these and no appreciable "knife skills."
In a previous post, I advised you to check the comments on a recipe. I substituted lime juice on the advice of the commenters, and did the Splenda for that reason as well (actually, that was at least partly because I'm very, very lazy, and I'd have had to open a new bag of sugar). I left out the garlic because I was in a hurry, and I left out the pepper because my daughter is sensitive to spice. I had never tried chayote before, so I consulted the recipe because I didn't want to totally screw it up. As it turned out, my husband loved it, and said he'd prefer it to zucchini anytime.
Almost done!
I said it was taco night, right? So I diced a few tomatoes and three avocados. I set out shredded cheese. I shredded some iceberg lettuce (the one time I really love it is on tacos, for its crunch), and I warmed some corn tortillas. Then it was up to everyone to make their own tacos.
I ate the chayote as a side dish, whereas the husband put it on his tacos. The kid declared that she liked cactus, but wanted more fake meat. We all liked the salsa and liquados. If you don't count the prep work did in the morning for the beverage and the beans, this was a meal that I got on the table in less than 90 minutes, even though I made the salsa, taco filling, and side dish and mashed the beans. I mentioned before that I'm no Martha Stewart, and I guess I'm no Rachel Ray (whose show is called "30 Minute Meals"), either, but it wasn't a work night. I cook a lot faster on work nights.
Anyway, happy cooking! I called this part 1 of "Get to know an ethic market" because, well, let's just say I'm very lucky to live where I do, and more ethnic market posts are on the way.
I went this week to La Superior Mercado, which, as you might have guessed, carries Hispanic foods. I love looking around, and I settled on a few items: a chayote squash, a bag of tomatillos, a small watermelon, some chili-spiced mango (just for a snack), a jicama, and a bag of nopalitos (cactus), pre-spined and diced. My total bill was just over $7. On another trip, I had seen a bag of "soya texturizada," and although I only speak enough Spanish to understand Speedy Gonzales, even I could figure that out -- TVP! It was a little less than at the hippie store, so I picked that up, too.
Just for fun, my family periodically studies another country or culture, so we've been eating Mexican food all week -- tamales (store-bought), refried beans (recipe below), a sort of Southwest-y salad -- but tonight I was going to do it up.
In the morning, I made watermelon liquados.
Watermelon liquados
1 personal-sized watermelon (preferably seedless)
1 Tbs crushed ginger
1/4 cup lime juice
water
I took all the watermelon out of the rind and threw it in the blender. Then I added about 2 cups of water, the ginger and lime juice. I blended it all to hell, then strained it into a bowl. I poured it into a pitcher and put it in the fridge until later. It was delicious and refreshing. I saw several similar recipes online, and all of them added sugar "to taste." I tasted it and felt it didn't need any sugar, but you do what you like.
I also started my refried beans, which I make in a slow cooker. These are such a hit in my house that we have them once a week.
Refried beans
2 cups dry pinto beans
1 onion
1 fresh jalapeno, diced OR 2 dried chipotle or de Arbol chiles, whole
1 Tbs cumin
2 Tbs salt
9 cups water
Peel the onion, cut the stem end off, and cut it in half. Add everything else to the slow cooker and turn it on "high." Leave it alone for about 9 hours (anywhere from 8-10 is fine). Drain most off the water off, remove the dried chiles if you used them, then mash with a potato masher. Done.
This recipe is pretty flexible -- you can put it in the slow cooker the night before to soak, then turn it on in the morning, or you can assemble it in the morning. You can use fresh or dried chiles, and any kind of onion. I was worried the first time I left it on High all day, because almost all the rest of my slow-cooker recipes call for the thing to be left on Low, but High is just perfect and won't burn your kitchen down, I swear.
Your bonus tip this week is "Get to know a measurement." I don't recommend this for baking, because baking is like science, but it works for most other cooking. Figure out how much a tablespoon is -- measure one out and dump it in the palm of your hand -- and then estimate it from now on. How much is 1/4 cup of water? What does it look like? If you can get to know some basic measurements, it'll cut down on the time it takes to cook as well as the dishes to clean up afterward.
One tablespoon of cumin.
After I turned the beans on, we spent the day at the fair. When we came home, I started cooking for real.
Tomatillo salsa
20 tomatillos, mixed sizes
1 red onion
2 serrano peppers
2 cloves garlic
1/2 cup loosely packed cilantro
lime juice
salt to taste
Remove the papery skins from the tomatillos, and cut into chunks (I cut the small ones into quarters and the big ones into eighths).
Put them on a cookie sheet, jelly roll pan, roasting pan, or whatever. I didn't want to clean it later, so I lined it with foil first.
Cut the onion into quarters and add to the pan. Then halve the peppers and remove the stems (I would leave the seeds in -- this was a fairly mild salsa) and add them as well.
I cooked it at a low broil. If you only have one option for broil, and that option is "nuclear," then roast at a high temperature, like 500, instead. I checked mine after 5 minutes and shook them around, then took them out after ten minutes when there were some nice dark brown bits.
Then I added the entire contents of the pan to my blender, threw in the garlic, added about 2 Tbs of lime juice, 1 Tbs salt, and the cilantro, then whirled it around until it was pretty.
My daughter even liked it, and she really balks at spicy foods, so don't worry about the serranos.
Veggie tacos
1 cup nopales, spines removed and diced
1 cup TVP
1 package taco seasoning (or feel free to use the spices -- I was being lazy)
hot water (about 2 cups)
In a bowl, soak the TVP in 1 cup of water. Put a little oil or cooking spray in a large pan over medium heat. Add the TVP and nopales, then the seasoning and additional water. It won't brown in the same way that meat will, but it will heat through, the nopales will get tender, and the seasoning will get mixed evenly.
Chayote squash
(I consulted this recipe)
1 Tbs olive oil
1 chayote
1/2 tsp salt
1 packet Splenda (or 1/2 tsp sugar)
1 Tbs lime juice
Peel and julienne the squash. Heat a small pan over medium-high heat and add the oil. Then add squash, salt, and sugar or sweetener. Saute, stirring frequently, for about 3 minutes, then add the lime juice and saute for about three more minutes. Serve.
Like my knife skills?
Just kidding -- I have one of these and no appreciable "knife skills."
In a previous post, I advised you to check the comments on a recipe. I substituted lime juice on the advice of the commenters, and did the Splenda for that reason as well (actually, that was at least partly because I'm very, very lazy, and I'd have had to open a new bag of sugar). I left out the garlic because I was in a hurry, and I left out the pepper because my daughter is sensitive to spice. I had never tried chayote before, so I consulted the recipe because I didn't want to totally screw it up. As it turned out, my husband loved it, and said he'd prefer it to zucchini anytime.
Almost done!
I said it was taco night, right? So I diced a few tomatoes and three avocados. I set out shredded cheese. I shredded some iceberg lettuce (the one time I really love it is on tacos, for its crunch), and I warmed some corn tortillas. Then it was up to everyone to make their own tacos.
I ate the chayote as a side dish, whereas the husband put it on his tacos. The kid declared that she liked cactus, but wanted more fake meat. We all liked the salsa and liquados. If you don't count the prep work did in the morning for the beverage and the beans, this was a meal that I got on the table in less than 90 minutes, even though I made the salsa, taco filling, and side dish and mashed the beans. I mentioned before that I'm no Martha Stewart, and I guess I'm no Rachel Ray (whose show is called "30 Minute Meals"), either, but it wasn't a work night. I cook a lot faster on work nights.
Anyway, happy cooking! I called this part 1 of "Get to know an ethic market" because, well, let's just say I'm very lucky to live where I do, and more ethnic market posts are on the way.
Tuesday 17 May 2011
How to find (and adapt) a great recipe: Fettucini with chard and sausage
I still love cookbooks. I have a bunch. Most of them I found through good reviews, through friends who suggested them, or just through browsing at bookstores. When you find a good cookbook, you can usually rely on most of the recipes in there.
But this is the information age, and I like to find information quickly. I do a lot of Googling, and I find a lot of recipes online. But how to know what's good? I'll tell you.
Google recently changed the way it searches for recipes, and they now give preference to things from bigger sites and neglect blogs. Which, you know, the foodies are up in arms about. But I don't care that much, because frankly, I like the bigger sites. Most of them have ratings and reviews, and that's how I find a good recipe.
First, when I search, if I really want something simple and I don't find it right away, I throw in another term -- instead of "homemade pasta," I'll search for "basic homemade pasta" or "easy homemade pasta" or "simple," or whatever. Then I start looking for stars. Yes, really.
If a recipe has four or five stars out of five, I click it and look. Now, I don't mind making things with a bajillion ingredients or that take two days, but it's not my favorite thing to do. I'm lazy, so I want something that seems do-able. I scan the ingredients and instructions, then decide whether it's worth looking at.
If it is, pretty much the first thing I do is read the comments. Sometimes, they'll be all over the place, but most of the time, they're all in agreement. They will look like this:
Good recipe! I used my own crust though and substituted shortening for butter, plus I cooked it for ten extra minutes.
My family loved this! I took it out of the oven ten minutes early because it was already brown. Also, I left out the onions and kale and replaced them with sweet potatoes and bacon. Oh, and I brushed the crust with egg.
This was so easy, except that I don't really like white flour, so I made the crust with garbanzo beans.
Guess what? I'm not going to make that recipe. No one else seems to have done so.
On the other hand, sometimes you'll find one where all the commenters agree that it was very good, but next time they'll cut the salt, or that they cut the salt and it was fine, or that it was a tad salty. That, I will make. And I'll cut the salt. From what I can tell, the people who write reviews of recipes genuinely want to share information with you.
Here's an example. I wanted to try making my own pasta, and I did.
I searched for "basic pasta recipe" and this was the first one to come up. Have a look at it. It has 4 1/2 stars, and the reviewers are in agreement: add some olive oil and let it rest.
I used semolina flour, and I needed to add a little extra water, too. It should be a very thick dough, but not crumbly.
You can totally roll it out with a rolling pin and cut it with a knife, but I got a pasta machine for cheap a few months ago. It was a bit of a learning curve, because the first time, I thought you could just shove a lump of dough at it (What? Not like I've ever seen anyone use a pasta machine before!), but then I figured out you have to roll it out a bit first. To get it to feed through the machine evenly, you should try to roll it into a sort of oblong, which you can do by only rolling back and forth rather than turning the dough as you would with a pie crust.
You have to roll it through the fattest size roller once, then fold it over and roll it again. Then you can roll it through successively smaller rollers until it's however thin you want. I went to "7" on my machine, which felt pretty thin. Then I put it through the cutter.
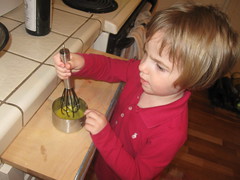
My helper beats the egg.

Shh... it's resting.
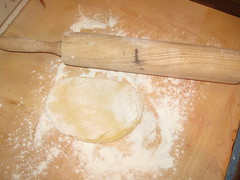
Rolling it with plenty of flour.
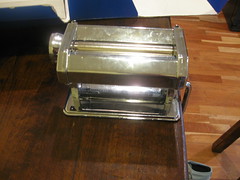
My machine... shiny!
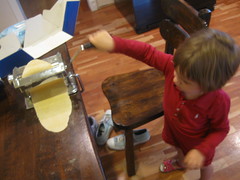
It's good to have help.
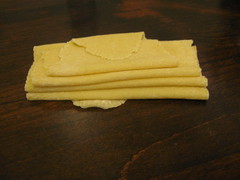
Rolled out.
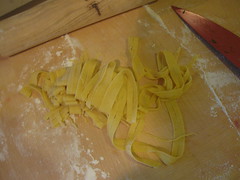
Cut.
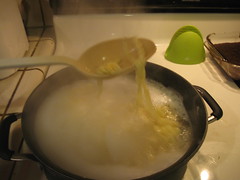
Cooking.
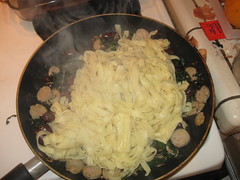
Mixing with the greens.
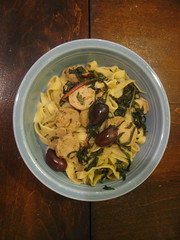
About ready to serve.
While it was resting, I made the chard stuff. My family actually loves tomato-based sauces, but we had a big bunch of chard from the neighbors' garden.
2 Tbs olive oil
6 cloves garlic
1 bunch chard
2 Italian-style sausages (mine were SmartLife veggie ones, but you use whatever works for you)
1/3 cup pitted kalamata olives
zest of 1 lemon
red pepper flakes
fresh grated parmesan
salt and pepper to taste
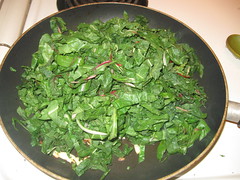
Heat a large pan over medium heat, then add olive oil. Add the garlic and saute until it's golden brown. Add all the chard and cook slowly for about ten minutes. If you're using meat sausage, you may want to add it before the greens so that it gets a chance to cook thoroughly, but with veggie sausage, it just has to get warm, so I put it in after.
Add the olives as well.
Season with the zest and red pepper flakes and turn heat to low. When the pasta is cooked, add it (and a bit of the cooking water) to the big pan and let it all mix up for a few minutes. I grate the parmesan on it at the table. I actually didn't add salt, but you might want to.
Note: I cut the chard by cutting out the stem, then stacking 5 or 6 leaves on top of one another. Then I roll them up like a cigar and slice the cigar. Once you fluff the resulting spirals up, you have very thinly sliced greens. Works with anything flat and leafy.
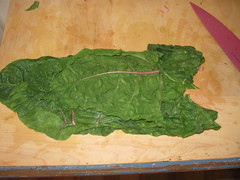
Stack.
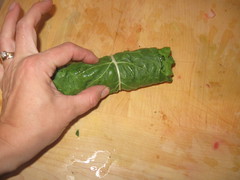
Roll.
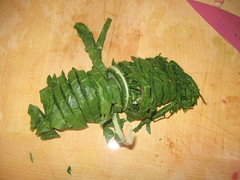
Slice.
Fluff.
This would have been super-duper awesome with onion, and I normally would add it, but I just forgot. Chop it, add it at the same time as the garlic, and go to town.
Enjoy!
But this is the information age, and I like to find information quickly. I do a lot of Googling, and I find a lot of recipes online. But how to know what's good? I'll tell you.
Google recently changed the way it searches for recipes, and they now give preference to things from bigger sites and neglect blogs. Which, you know, the foodies are up in arms about. But I don't care that much, because frankly, I like the bigger sites. Most of them have ratings and reviews, and that's how I find a good recipe.
First, when I search, if I really want something simple and I don't find it right away, I throw in another term -- instead of "homemade pasta," I'll search for "basic homemade pasta" or "easy homemade pasta" or "simple," or whatever. Then I start looking for stars. Yes, really.
If a recipe has four or five stars out of five, I click it and look. Now, I don't mind making things with a bajillion ingredients or that take two days, but it's not my favorite thing to do. I'm lazy, so I want something that seems do-able. I scan the ingredients and instructions, then decide whether it's worth looking at.
If it is, pretty much the first thing I do is read the comments. Sometimes, they'll be all over the place, but most of the time, they're all in agreement. They will look like this:
Good recipe! I used my own crust though and substituted shortening for butter, plus I cooked it for ten extra minutes.
My family loved this! I took it out of the oven ten minutes early because it was already brown. Also, I left out the onions and kale and replaced them with sweet potatoes and bacon. Oh, and I brushed the crust with egg.
This was so easy, except that I don't really like white flour, so I made the crust with garbanzo beans.
Guess what? I'm not going to make that recipe. No one else seems to have done so.
On the other hand, sometimes you'll find one where all the commenters agree that it was very good, but next time they'll cut the salt, or that they cut the salt and it was fine, or that it was a tad salty. That, I will make. And I'll cut the salt. From what I can tell, the people who write reviews of recipes genuinely want to share information with you.
Here's an example. I wanted to try making my own pasta, and I did.
I searched for "basic pasta recipe" and this was the first one to come up. Have a look at it. It has 4 1/2 stars, and the reviewers are in agreement: add some olive oil and let it rest.
I used semolina flour, and I needed to add a little extra water, too. It should be a very thick dough, but not crumbly.
You can totally roll it out with a rolling pin and cut it with a knife, but I got a pasta machine for cheap a few months ago. It was a bit of a learning curve, because the first time, I thought you could just shove a lump of dough at it (What? Not like I've ever seen anyone use a pasta machine before!), but then I figured out you have to roll it out a bit first. To get it to feed through the machine evenly, you should try to roll it into a sort of oblong, which you can do by only rolling back and forth rather than turning the dough as you would with a pie crust.
You have to roll it through the fattest size roller once, then fold it over and roll it again. Then you can roll it through successively smaller rollers until it's however thin you want. I went to "7" on my machine, which felt pretty thin. Then I put it through the cutter.
My helper beats the egg.
Shh... it's resting.
Rolling it with plenty of flour.
My machine... shiny!
It's good to have help.
Rolled out.
Cut.
Cooking.
Mixing with the greens.
About ready to serve.
While it was resting, I made the chard stuff. My family actually loves tomato-based sauces, but we had a big bunch of chard from the neighbors' garden.
2 Tbs olive oil
6 cloves garlic
1 bunch chard
2 Italian-style sausages (mine were SmartLife veggie ones, but you use whatever works for you)
1/3 cup pitted kalamata olives
zest of 1 lemon
red pepper flakes
fresh grated parmesan
salt and pepper to taste
Heat a large pan over medium heat, then add olive oil. Add the garlic and saute until it's golden brown. Add all the chard and cook slowly for about ten minutes. If you're using meat sausage, you may want to add it before the greens so that it gets a chance to cook thoroughly, but with veggie sausage, it just has to get warm, so I put it in after.
Add the olives as well.
Season with the zest and red pepper flakes and turn heat to low. When the pasta is cooked, add it (and a bit of the cooking water) to the big pan and let it all mix up for a few minutes. I grate the parmesan on it at the table. I actually didn't add salt, but you might want to.
Note: I cut the chard by cutting out the stem, then stacking 5 or 6 leaves on top of one another. Then I roll them up like a cigar and slice the cigar. Once you fluff the resulting spirals up, you have very thinly sliced greens. Works with anything flat and leafy.
Stack.
Roll.
Slice.
Fluff.
This would have been super-duper awesome with onion, and I normally would add it, but I just forgot. Chop it, add it at the same time as the garlic, and go to town.
Enjoy!
Wednesday 11 May 2011
More roasting: the world's second easiest salsa
The world's first-easiest salsa is pico de gallo, where you chop up tomatoes, onions, garlic, cilantro, peppers, and throw in salt and a squeeze of lime juice. This is the world's second easiest, because you throw them in the oven first.
8 roma tomatoes (other tomatoes can be used, but will be more watery)
1 onion
2 jalapenos
1 serrano
2 cloves garlic
1/4 cup cilantro
1/4 cup lime juice
2 tsp sea salt
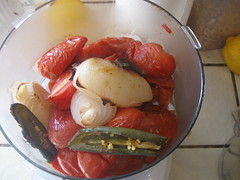
Pre-heat the oven to 450. Slice the tomatoes in half. Peel the onion, cut off the ends, and cut in half. Cut the stems off the peppers and cut them in half (don't bother to seed them unless you're super-sensitive to heat). Peel the garlic cloves. Add tomatoes, onion, garlic, and peppers to a roasting pan coated in cooking spray. Put them in the oven and cook for about 30 minutes.
Add the roasted veggies, cilantro, lime juice and salt to a food processor or blender.
Whirl it around until it's the texture you prefer. Serve warm or chill.
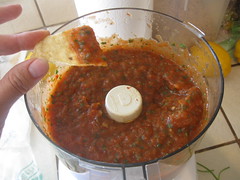
(I couldn't wait.)
There's a lot of flexibility in this. If you just love heat, add more peppers or use hotter ones, like habaneros or scotch bonnets. You can start off only adding part of the lime juice or salt and stop adding when it tastes good to you. You can throw in any other ingredient that floats your boat. Have fun and experiment. That's half the battle to becoming a goodest cooker: learning through trial and error.
8 roma tomatoes (other tomatoes can be used, but will be more watery)
1 onion
2 jalapenos
1 serrano
2 cloves garlic
1/4 cup cilantro
1/4 cup lime juice
2 tsp sea salt
Pre-heat the oven to 450. Slice the tomatoes in half. Peel the onion, cut off the ends, and cut in half. Cut the stems off the peppers and cut them in half (don't bother to seed them unless you're super-sensitive to heat). Peel the garlic cloves. Add tomatoes, onion, garlic, and peppers to a roasting pan coated in cooking spray. Put them in the oven and cook for about 30 minutes.
Add the roasted veggies, cilantro, lime juice and salt to a food processor or blender.
Whirl it around until it's the texture you prefer. Serve warm or chill.
(I couldn't wait.)
There's a lot of flexibility in this. If you just love heat, add more peppers or use hotter ones, like habaneros or scotch bonnets. You can start off only adding part of the lime juice or salt and stop adding when it tastes good to you. You can throw in any other ingredient that floats your boat. Have fun and experiment. That's half the battle to becoming a goodest cooker: learning through trial and error.
Tuesday 10 May 2011
Get to know a technique: roasting (Israeli couscous with roasted veggies)
I think that to be a goodest cooker, you need to know a few techniques, and one of my favorites is roasting.
The benefit of knowing a technique is that, if you have something you want to cook, you have at least one go-to thing you can do without consulting a recipe.
The benefit of roasting, in particular, is that it makes EVERYTHING BETTER. Proof? Roasted garlic. You all know that garlic is awesome just by itself, but can you remember the first time you had roasted garlic? Sweet, warm, creamy... Ah. Well, it does that to other stuff, too.
Here's what to do: if you're using something that doesn't take very long to cook (mushrooms, sweet peas, asparagus, broccoli, tomatoes...), you can pretty much leave it whole and roast it for about 20 minutes in a 425 degree oven.
Anything that's hard or takes a long time to cook (potatoes, sweet potatoes, fennel, leeks, onions, carrots, cauliflower, parsnips, rutabagas, turnips...) can go in at the same temperature (or higher, up to 475 or so) for about 45 minutes.
If you want to know if it's done, there are two tests. First, is it just a little brown? Potatoes look pretty golden-brown when they're done. Peas have brown spots.
Second, can you push a fork into it without throwing your weight behind the thing? Then it's probably good.
The absolute simplest way to dress anything is to coat it in olive oil, then sprinkle it with salt and pepper before it goes in the oven (sea salt is better but table is fine, fresh ground pepper is better but from the shaker is fine).
But here's where roasting gets fun. You can do nearly anything to these veggies. You can put fresh or dried herbs on them, you can add liquids like orange juice, soy sauce, balsamic vinegar, flavored oils and more (harissa, sriracha, apricot jam, barbecue sauce, or your creative favorite), or any kind of dried herb or spice (I like smoked paprika on a lot of stuff, and crushed red peppers, too).
I can recommend kale or chard, with the tough stem removed, ripped into pieces (about 2 inches square, I guess), and tossed with a citrus-flavored olive oil, some salt, and red pepper flakes (go easy on the salt, as kale and chard shrink a LOT when cooking).
I like potatoes with almost anything, but especially chopped fresh rosemary (or, bless my trashy heart, Lawry's Seasoned Salt).
Sweet potatoes are absolutely awesome with just some nutmeg, but even better if you make a little sauce of orange juice, nutmeg, salt, pepper and maple syrup or brown sugar. Toss them in the oj mixture, then lay them out in the pan (you'll probably want to spray the pan with cooking spray).
I haven't tried it yet, but I'd be willing to bet those sweet peas would be delightful with some soy sauce drizzled on top, or even a dollop of hoisin in some rice wine vinegar.
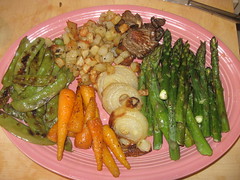
Here was tonight's dinner:
Roasted veggies
2 cups sweet peas, the strings removed
9 very small carrots, washed but not peeled
2 medium potatoes, peeled and diced
2 cup oyster mushrooms, stems trimmed
1 yellow onion, cut into very thick slices
1 bunch asparagus, ends snapped off
Pre-heat oven to 425 degrees.
Coat a big roasting pan in olive oil, then add all ingredients and roll them around so they get coated in the oil. They cook at different times, so keep them separate. Sprinkle the whole mess with salt and pepper to taste.
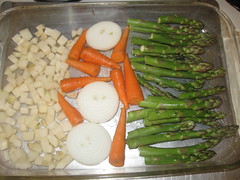
After 20 minutes, remove the mushrooms, asparagus, and peas (you could take them out at 15 minutes if they were done enough for you -- they'd still have some snap, but might not be as sweet).
After 45 minutes to an hour (check on them), remove the other veggies.
Israeli Couscous
2 cups couscous
4 cups water
1/2 cup oil (your choice, I used flax oil)
1/4 cup lemon juice (or acid of your choice like cider vinegar)
1 clove minced garlic
1 tsp dried herbs of your choice (I used zatar seasoning, but italian herb mix would be fine)
1 Tbs mustard (any kind)
salt and pepper to taste
Bring the water to a boil and add the couscous. Turn down heat and cook at a low boil for about five minutes. Taste to test for doneness (they should be just a little toothsome, but not mushy).
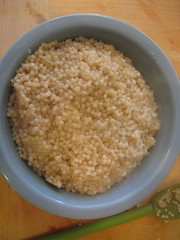
Put all the other ingredients in a Mason jar and shake them up. Pour over the couscous, then serve with the veggies. Can be served hot, warm, or cold.
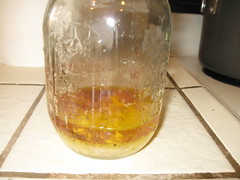
Pre-shake
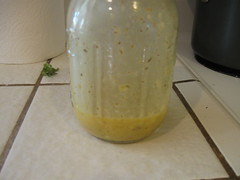
Post-shake
Tips
To keep the pans from getting stuff stuck to them, which makes them a pain to wash, either coat them well with olive oil or spray them with cooking spray. If you want your cleanup to consist of wadding up a piece of foil, you can cover the pain in foil. It totally works.
You can do other stuff with these veggies besides just eat them. You can mash them, puree them, make them into soup, serve them on crostini (the onions in particular), put them on a sandwich (roasted sweet potato on a sandwich is like a miracle)... Roasted onions in potato soup would give it a whole different, sweet dimension.
You can control how big the pieces are, so think about what you want. With potatoes, I like about a half-inch dice, because then you get a crunchy outside and a bit of soft inside. If it's a bigger cube, you don't get as much crunch, and if it's a smaller cube, you get ALL crunch. I am particular about my crunchy-to-soft ratio. Broccoli can be in pieces about the size of golf balls or in tiny florets, but the tiny ones are going to get browner. I'd leave them big. I roasted my carrots whole (and by god, they were delicious), but they were very petite, freshly plucked carrots. Big old woody ones would be best sliced into rounds.
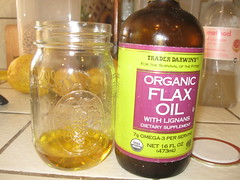
Finally, on the salad dressing. Dude. Salad dressing is an awesome thing to be able to make, and you can make it into almost anything you want. Make sure you have about twice as much oil as acid, and from there anything goes. I've added crushed berries, fresh herbs, dried herbs, mustard, crushed ginger... The oil can be nearly anything. I use flax oil because it's supposed to have Omega-3 fatty acids, which, as a veggie, I don't get much of*. But you could use olive oil, sesame oil (for Asian dressings), peanut oil, or even canola oil (I prefer the flavor of olive oil to just about anything else). Same goes for the acid. You can use balsamic vinegar, red wine vinegar, cider vinegar, rice vinegar (especially good with the sesame oil for the Asian dressing), lemon juice, grapefruit juice... Add the herbs of your choice and be creative. It takes just a couple minutes and homemade salad dressing can be very satisfying (and obviously, you can use it on grain salads, lettuce, or pasta).
*Some people who call themselves vegetarian eat fish, which is a good source of Omega-3s, but I don't. So there you go. Flax oil doesn't taste wonderful like olive oil does, but it doesn't taste bad, either. I like it in salad dressings because the other flavors overpower it.
In a couple days I'll update with another great roasted recipe -- roasted salsa. I hope you can use something here. If you try anything, for goodness' sake, try the onions. They're unbelievably sweet.
The benefit of knowing a technique is that, if you have something you want to cook, you have at least one go-to thing you can do without consulting a recipe.
The benefit of roasting, in particular, is that it makes EVERYTHING BETTER. Proof? Roasted garlic. You all know that garlic is awesome just by itself, but can you remember the first time you had roasted garlic? Sweet, warm, creamy... Ah. Well, it does that to other stuff, too.
Here's what to do: if you're using something that doesn't take very long to cook (mushrooms, sweet peas, asparagus, broccoli, tomatoes...), you can pretty much leave it whole and roast it for about 20 minutes in a 425 degree oven.
Anything that's hard or takes a long time to cook (potatoes, sweet potatoes, fennel, leeks, onions, carrots, cauliflower, parsnips, rutabagas, turnips...) can go in at the same temperature (or higher, up to 475 or so) for about 45 minutes.
If you want to know if it's done, there are two tests. First, is it just a little brown? Potatoes look pretty golden-brown when they're done. Peas have brown spots.
Second, can you push a fork into it without throwing your weight behind the thing? Then it's probably good.
The absolute simplest way to dress anything is to coat it in olive oil, then sprinkle it with salt and pepper before it goes in the oven (sea salt is better but table is fine, fresh ground pepper is better but from the shaker is fine).
But here's where roasting gets fun. You can do nearly anything to these veggies. You can put fresh or dried herbs on them, you can add liquids like orange juice, soy sauce, balsamic vinegar, flavored oils and more (harissa, sriracha, apricot jam, barbecue sauce, or your creative favorite), or any kind of dried herb or spice (I like smoked paprika on a lot of stuff, and crushed red peppers, too).
I can recommend kale or chard, with the tough stem removed, ripped into pieces (about 2 inches square, I guess), and tossed with a citrus-flavored olive oil, some salt, and red pepper flakes (go easy on the salt, as kale and chard shrink a LOT when cooking).
I like potatoes with almost anything, but especially chopped fresh rosemary (or, bless my trashy heart, Lawry's Seasoned Salt).
Sweet potatoes are absolutely awesome with just some nutmeg, but even better if you make a little sauce of orange juice, nutmeg, salt, pepper and maple syrup or brown sugar. Toss them in the oj mixture, then lay them out in the pan (you'll probably want to spray the pan with cooking spray).
I haven't tried it yet, but I'd be willing to bet those sweet peas would be delightful with some soy sauce drizzled on top, or even a dollop of hoisin in some rice wine vinegar.
Here was tonight's dinner:
Roasted veggies
2 cups sweet peas, the strings removed
9 very small carrots, washed but not peeled
2 medium potatoes, peeled and diced
2 cup oyster mushrooms, stems trimmed
1 yellow onion, cut into very thick slices
1 bunch asparagus, ends snapped off
Pre-heat oven to 425 degrees.
Coat a big roasting pan in olive oil, then add all ingredients and roll them around so they get coated in the oil. They cook at different times, so keep them separate. Sprinkle the whole mess with salt and pepper to taste.
After 20 minutes, remove the mushrooms, asparagus, and peas (you could take them out at 15 minutes if they were done enough for you -- they'd still have some snap, but might not be as sweet).
After 45 minutes to an hour (check on them), remove the other veggies.
Israeli Couscous
2 cups couscous
4 cups water
1/2 cup oil (your choice, I used flax oil)
1/4 cup lemon juice (or acid of your choice like cider vinegar)
1 clove minced garlic
1 tsp dried herbs of your choice (I used zatar seasoning, but italian herb mix would be fine)
1 Tbs mustard (any kind)
salt and pepper to taste
Bring the water to a boil and add the couscous. Turn down heat and cook at a low boil for about five minutes. Taste to test for doneness (they should be just a little toothsome, but not mushy).
Put all the other ingredients in a Mason jar and shake them up. Pour over the couscous, then serve with the veggies. Can be served hot, warm, or cold.
Pre-shake
Post-shake
Tips
To keep the pans from getting stuff stuck to them, which makes them a pain to wash, either coat them well with olive oil or spray them with cooking spray. If you want your cleanup to consist of wadding up a piece of foil, you can cover the pain in foil. It totally works.
You can do other stuff with these veggies besides just eat them. You can mash them, puree them, make them into soup, serve them on crostini (the onions in particular), put them on a sandwich (roasted sweet potato on a sandwich is like a miracle)... Roasted onions in potato soup would give it a whole different, sweet dimension.
You can control how big the pieces are, so think about what you want. With potatoes, I like about a half-inch dice, because then you get a crunchy outside and a bit of soft inside. If it's a bigger cube, you don't get as much crunch, and if it's a smaller cube, you get ALL crunch. I am particular about my crunchy-to-soft ratio. Broccoli can be in pieces about the size of golf balls or in tiny florets, but the tiny ones are going to get browner. I'd leave them big. I roasted my carrots whole (and by god, they were delicious), but they were very petite, freshly plucked carrots. Big old woody ones would be best sliced into rounds.
Finally, on the salad dressing. Dude. Salad dressing is an awesome thing to be able to make, and you can make it into almost anything you want. Make sure you have about twice as much oil as acid, and from there anything goes. I've added crushed berries, fresh herbs, dried herbs, mustard, crushed ginger... The oil can be nearly anything. I use flax oil because it's supposed to have Omega-3 fatty acids, which, as a veggie, I don't get much of*. But you could use olive oil, sesame oil (for Asian dressings), peanut oil, or even canola oil (I prefer the flavor of olive oil to just about anything else). Same goes for the acid. You can use balsamic vinegar, red wine vinegar, cider vinegar, rice vinegar (especially good with the sesame oil for the Asian dressing), lemon juice, grapefruit juice... Add the herbs of your choice and be creative. It takes just a couple minutes and homemade salad dressing can be very satisfying (and obviously, you can use it on grain salads, lettuce, or pasta).
*Some people who call themselves vegetarian eat fish, which is a good source of Omega-3s, but I don't. So there you go. Flax oil doesn't taste wonderful like olive oil does, but it doesn't taste bad, either. I like it in salad dressings because the other flavors overpower it.
In a couple days I'll update with another great roasted recipe -- roasted salsa. I hope you can use something here. If you try anything, for goodness' sake, try the onions. They're unbelievably sweet.
Subscribe to:
Posts (Atom)